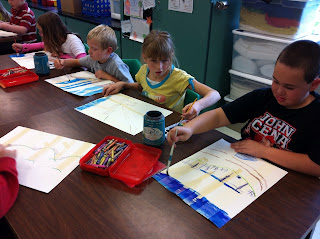
The birch tree project is one of my all time favorite projects to do! I've done this with my 3rd graders each year I've taught so far, and each time I do it a little bit differently. The first year, we did winter birch trees, using masking tape to mask off the trees before painting and markers to add the tree lines. Last year, we did winter birch trees, using salt in the sky to make snow flakes and marker again for the tree lines. This year, thanks to Pinterest, I think I've made this project even more exciting for the kids! This year, my 3rd graders will be doing this project two more times so that they can master depth using a horizon line, placement and size. Here are the steps we took to make this project!
1. On the first day, we looked at various photographs of trees and discussed depth. We talked about placement of the trees in the foreground, middle-ground and background, as well as how skinny or thick they were in relation to their distance from the viewer. Then we taped off our trees and drew our horizon line in. The tree placement was a struggle to understand for some students, so it required some assistance from me. I had the students who really understood the concept go around and help othersStudents were allowed to color any details they wanted to add with crayons, such as a path, pond, house, etc. but were not allowed to color the sky or grass.
2. On the 2nd day, we finished coloring our details and painted our drawings with watercolor paint. I did a demonstration on how to blend watercolor paints before they dry to alter their colors a little bit.
3. On the third day, we peeled off the tape very carefully. I demonstrated to the students how to use the flat side of a scraper to add the birch tree lines with black tempera paint. The last step was to add fall colored leaves to our paintings with Q-tips! I LOVE the way these turned out! They are always one of my favorite projects to do because no matter what the skill level, it's pretty easy get all the students to succeed! Plus, this year I plan to do a winter version and a spring/summer version with all the students so they should be able to plan their tree placement and horizon lines on their own without my help by the end of the year!
The first two paintings are student's and the one on the bottom is mine that I did to demo all the techniques. More pictures to come! These were all stacked on the drying rack when I left school Friday so I couldn't take many pictures!


Beautiful work. An oldie but a goodie! I love the addition of the road to add perspective and depth :)
ReplyDeleteThese are beautiful! I'm doing a color study with 5th grade and we are going to be putting birch trees in their pieces using the same scraping technique to create the illusion of texture of the white birch bark. I love how they always come out!
ReplyDeleteThis year my art show theme is nature, so I can't wait to hang these! It will also be cool because i plan to do two other seasons of birch trees with them to teach different watercolor techniques. I always get the biggest reviews when these are hanging in the hallway! They are definitely going up Wednesday...we have parent teacher conferences in thursday this week!
ReplyDeleteGorgeous ~ nicely done! I'm pinning this to remember to tape off the trees!
ReplyDelete