Thursday, February 28, 2013

Getting Ready for YAM!

Tomorrow officially kicks off my YAM festivities at school.  Here's what I have done so far!
This is for my YAM bulletin board.  I'm going to put the caption, "Share your favorite art memory!" on the board with this and invite faculty, staff, students and community members to write in the logo.

Every day I will be giving an art trivia question on the morning announcements.  I'll take all of the correct answers at the end of the day and do a drawing for sketchbook and an art medium to go along with it.  Since I don't like the washable watercolors I bought, I'm going to give the rest of them away.  I also have some conte crayons that I don't use in class that I'll give away.  I got these YAM stickers from Nasco to attach to everything I give away.

Here are my interesting trivia facts.  Some of these are trivia I had in my art history notes, others just from surfing the web.  I don't have all of the sources to site for these...but if you search "interesting art trivia" on Yahoo! or Google, you'll find most of these.


I am a priceless painting of a woman.  I was stolen from the Louvre Museum in Paris by an employee in 1911, but returned two years later.  In 1956, a man threw a rock at me and damaged the paint next to my left elbow.  I am currently in the Louvre Museum in Paris, protected in a climate controlled environment and encased in bullet proof glass, which cost seven million dollars to build.  Leonardo da Vinci spent 12 years painting my lips.  Who am I?  The Mona Lisa

Vincent Van Gogh produced more than 2000 artworks during his lifetime: approximately 900 paintings and 1100 drawings and sketches.  How many paintings did Vincent Van Gogh sell during his lifetime?  While Vincent Van Gogh is now considered a very famous artist, he only sold one painting while he was alive, Red Vineyard at Arles.  As with many other artists, Van Gogh only became famous after his death.

Where was the first pencil invented?  England in 1565.

What are Mondrian’s favorite colors?  Mondrian painted all of his paintings with the primary colors: red, yellow and blue.

Pablo Picasso is an artist famous for starting the cubism style in 1909.  He has a very long name, made up of 23 names, as he was named after various saints and relatives. (Pablo Diego José Francisco de Paula Juan Nepomuceno María de los Remedios Cipriano de la Santísima Trinidad Martyr Patricio Clito Ruíz y Picasso).  Interestingly enough, Picasso learned to draw before he learned how to walk!  His first word was “piz”, which is short for “lapis” and is Spanish for what?  Lapiz is Spanish for pencil.

This artist is also well known for being an inventor.  In 1495, he designed a pyramid-shaped parachute and began painting The Last Supper.  This artist and inventor is also credited for designing and inventing the high heel shoe for Catherine de Medici, who was from a prominent Italian family who commissioned lots of art from famous artists.  Who is it?  Leonard da Vinci.  Rumor has it, da Vinci invented high heels for himself because he didn't like being short, but others say he invented them for Catherine de Medici to wear at her wedding.

This artist considered himself more of a sculptor than a painter, but eventually Pope Julius II convinced him to paint the Sistine Chapel.   It took this artist four years to paint the ceiling, and he did so while lying on his back.  Who is it?  (Hint:  One of the Ninja Turtles was named after this artist!)  Michelangelo

This artist is famous for his glass work.  This artist designs all of his art, but because of a car accident in which he lost one of his eyes, he cannot blow the molten glass to create his art.  Because of that, he works in collaboration with other glass artists.  Some of his famous series are the Macchia series, his chandeliers, and Persians.  Who is the artist?  Dale Chihuly

This artist was born in 1958 and died at the age of 31 in 1990 from a disease that was untreatable at the time.  His art style was a blend of graffiti art and advertising design.  This artist’s work is very colorful and our mural by the Elementary gym is based on his artwork.  Who is the artist?  Keith Haring

This artist was influenced by history, philosophy, religion and music.  He believed that, “Artists must express the spirit and their innermost feelings by orchestrating color, form line and space.”  Not only did he create art, but he also played the cello and the piano.  This artist claimed he could see colors when he listened to music, so he painted all of his paintings while listening to music.  Who is the artist?  Wassily Kandinsky

This artist is probably most well-known for the metal breakdown he had while fighting with his artist friend, Paul Gauguin.  During this fight, the artist got so upset that he cut off part of his hear and sent it to his girlfriend!  Who is the artist?  Vincent Van Gogh  (I realize that this fact is a little skewed...there are many versions of what actually happened...I've heard he mailed it to his girlfriend, cut it off and hand-delivered it to a prostitute.  I figure this is the most appropriate way to say this trivia fact over the announcements!)

This artist was born in 1912 and died in 1956 in a car accident.  He is known for his “drip” style painting, also known as “action painting.”  His canvases were so large that he once knocked down a wall in his studio to make it large enough for a 20-foot canvas.  In 2006, his painting, “No. 5, 1948” sold at an auction for $140 million, making it the most expensive painting ever.  Who is the artist?  Jackson Pollock

I'm going to fill in some of these artist facts with some random color theory questions, elements of art questions, etc. etc.


This is my flyer that is going home with students for the spirit week next week.  I am reviewing each color theory term in class and having the students color in the words with the correct colors.

This is the version of my take-home flyer that is hanging in each classroom and in the hallways.


Finally, today we started prepping for our first bottle cap mural.  I had my kinders start sorting the caps within each color category...light, middle and dark tones of each color.

These 5th graders helped draw out the Starry Night on the boards, and the rest continued the bottle cap sorting.


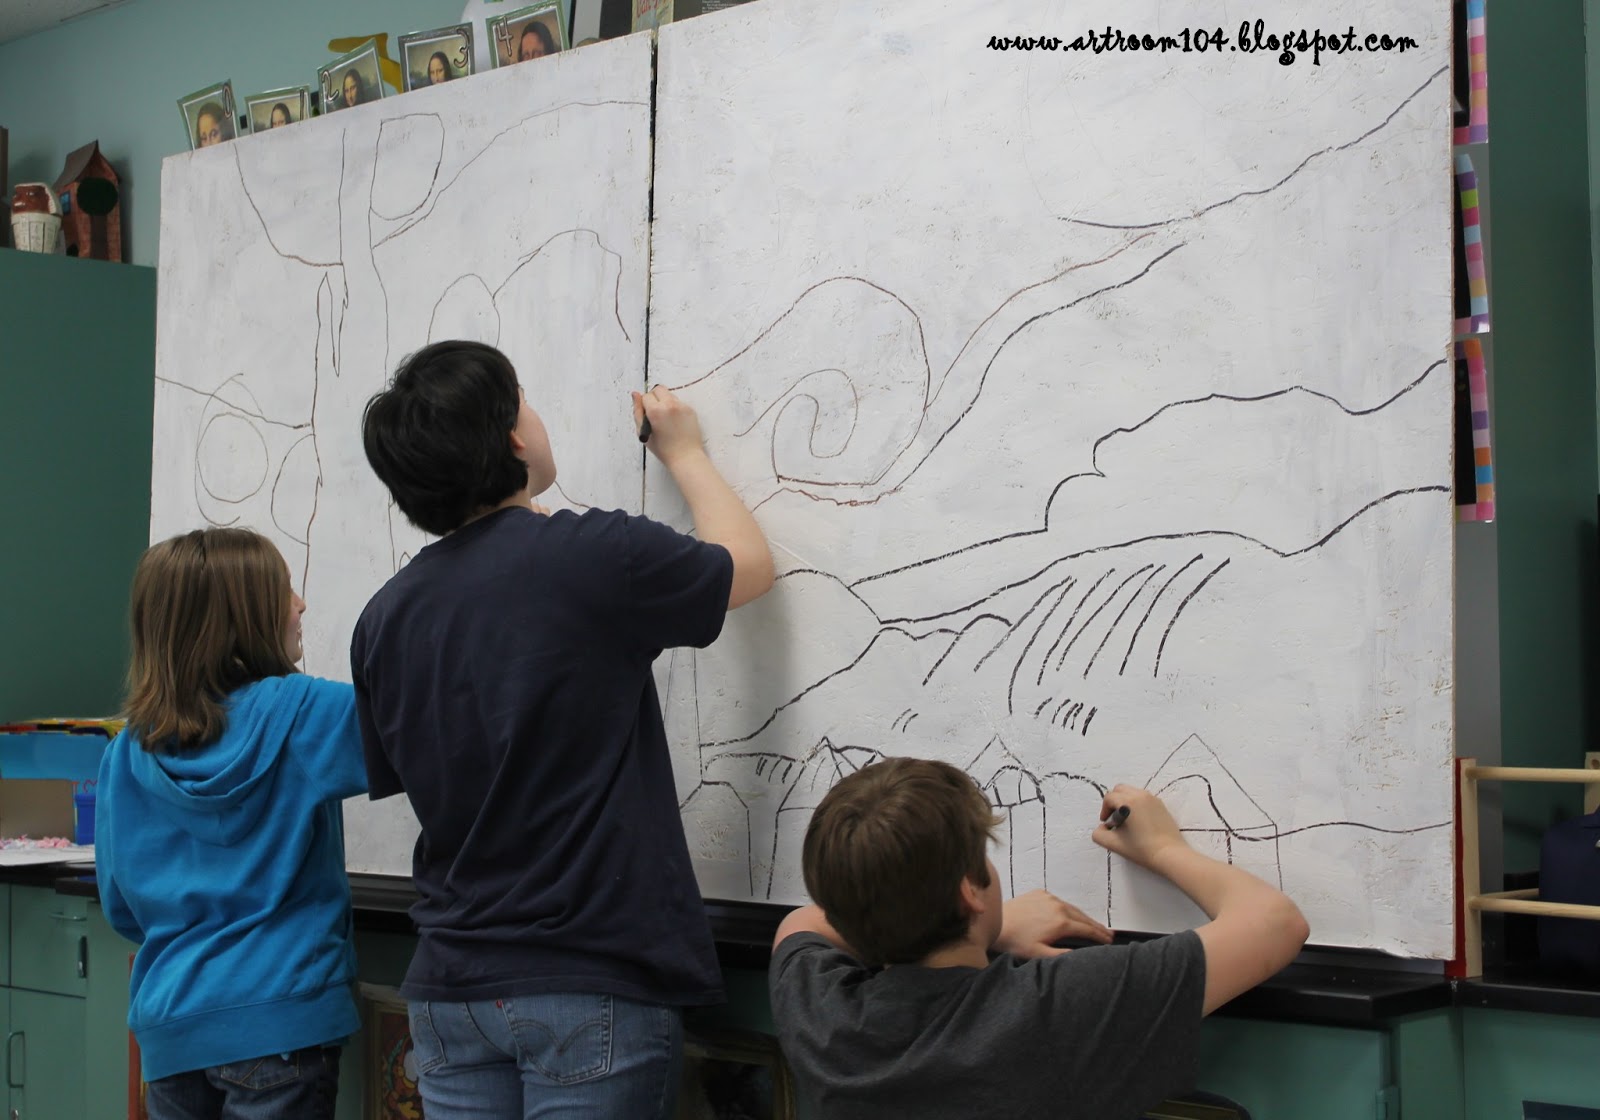
These 6th graders were finished with their projects so I had them outline the traced Starry Night with black marker so we could see it better.  Tomorrow I'll have students start painting the boards.

Staff Practice Portraits

Whew!  Sorry about the lack of posts the last few days!  I've been running around like a mad woman trying to get our taxes done, get my last minute YAM preparations finished, and so on and so forth!

My 4th graders are finishing up their staff practice portraits, so I thought I'd share a few with you.  I've seen variations of these on Pinterest, and that is where I originally got the idea.  This was also going to be the final project for the portrait unit, but when I saw how well the students did with their self-portraits, I decided to make this practice for the final portrait.

 I decided to give the students the option of doing the final portrait in black and white or in colored pencil, so on the practice drawings, I asked them to draw and add value in pencil first, and then use colored pencil as well.  Some of these drawings are a little rough, but I actually think that this was harder for them than drawing the full portrait will actually be.

They are really excited to do the full portrait, but I will be taking a break from the portraits (to give a breather and regroup for those who are starting to get bored by it) to do some of the YAM activities I have planned.  Not sure if it will be a good break or a bad break from the project...some of them seem to be getting "lazy" and forgetful when it comes to adding value to their portraits.  We may have to come back around and do a value review project after this.


Saturday, February 23, 2013

Gettin' Ready...One More Day of Relaxation!

I decided to head to my classroom today to see what damage was done when they cleaned my room over the break.  This was one of those BIG classroom cleanings, where they take everything out to strip and wax the floors.  Surprisingly, I was shocked to find that it was 96% put back together!  All I had to do was rearrange my tables to be in the correct color order.

I was also happy to see two boxes from Blick delivered to my room!  In box #1...the small box...I found all my 4" canvases I ordered before break for our March faulty meeting about YAM. In box #2????  (Drum roll please...) My display strips that I ordered!  


 I must say I am impressed with these!  I pulled one out to test it and I was able to hang an 8 1/2"x11" canvas board AND a thin collage project together on one strip!  Gave it a shake, and nothing fell out!

Thanks everyone who helped me out and gave their input on those display strips back in January.  I ended up being torn between option #1 and #2.  I decided to try #1 and I bought it in 6' lengths.  That was the cheapest way (cheaper than the 8' lengths).  I bought enough to do two walls of 54'.  Hopefully I'll have pictures to share this week after I convince the custodians to hang them for me!

I also worked on getting ready to do my first bottle cap mural.  I decided that I like the idea of doing the cap mural for YAM.  I'm thinking I will be able to get each class to work on it once to finish the entire thing.  I bought this 4'x8' board from Lowes for $10 and had them cut it in half for me (so it would fit in the back of my truck and be more manageable).  Today I took them in and primed them with a layer of gesso.  I was thinking of having the students gesso them, but I didn't want any of that wasted so I decided to do that part.


I plan on borrowing the COW (computer on wheels) from the library to project Starry Night onto the boards and I'll have my art club draw it out and outline it with black markers.  Then, I'll have the kindergartners and 1st graders sort the colors into dark and light (right now I just have all the blues sorted into one pile, reds in another, etc.)  I'll have 2nd and 3rd graders work on painting the board the colors it will need to be when we place the bottle caps.  I'll have 4th, 5th and 6th place the caps and glue them using caulking.  At least that's my plan as I think of it right now...it will probably change as I start this and run into road blocks, but that's the joy of being an art teacher who is flexible I suppose!  (Somewhere in there I'll have to have students clean caps for me too!)

I know Starry Night is probably a tad bit overdone in bottle caps, but I can't help it!  I LOVE Van Gogh, as do my students!  And, my superintendent's favorite artist is Van Gogh, so it will definitely get hunt in our school! ;)  I've seen so many versions on Pinterest and they all turn out awesomely different!  Next year, I think we'll make up our own mural to do in caps.


Friday, February 22, 2013

Free Stuff! Check out iPevo!

Have you heard of iPevo??  If not, head over to their website now!  If you are trying to integrate technology, specifically the iPad, into your classroom, this is the site for you.  They give away free products to teachers in need!  Click on the Wishpool link and there you can make an account and sign up for the free giveaway for the month. 

I can't really remember specifically where I saw the information for this site...it was from another art teacher blog...but I found it, visited it, signed up and a week later, I was notified of a shipment from iPevo!  I received a FREE iPevo Typi Folio Case and Wireless Keyboard ($55 value!) and an iPevo Point 2 View Document Camera (a $69 value!).  At this point, I didn't even have an iPad yet!  

What you do is tell iPevo why you want/need their free gift, and how you will use it.  Each month they give away two different items.  In my write-up, I mentioned how I was trying to get my district to purchase me an iPad for my room, and I thought that if I could show them I was working on getting the technology to integrate it into my classroom for whole class use, they might buy me an iPad sooner rather than later.  And voila!  My wish was granted by Wishpool and my district gave me an iPad to set-up from a grant!

A few days later, I tested out the document camera when I gave my demonstration to the 5th graders on how to paint the backgrounds of their monochromatic VanGogh paintings.  The only thing I need to do is bring in a table top lamp to better get light into the camera when using it with the lights off, but it does the trick!  Much easier than trying to have the kids all cram around me to see the demonstration!


All iPevo asks you to do is send them photographs and your story as to how you are using their product after you receive it!  That's on my to-do list!

Now all I need to do is get the cord I need to connect my iPad to the Smartboard so that it can actually be controlled by touching the Smartboard and I'll be all set!

Thursday, February 21, 2013

Extended Day Projects: Clay, Air-Brush, and Periscopes!

Here are some of the projects we've been doing in the Extended Day program.  I did a clay project with the students using my slump/hump molds and some new clay supplies that I recently bought after my trip to the NYSATA conference.  I've used these molds last year, but the foot mold and pattern rollers were new to try out this year.  I also let the students test out and try the Mayco cobblestone glazes that I purchased to try out.  Pretty cool effects!


Another project we did was to design t-shirts using Crayola's Airbrush Marker Set.  I bought 6 of them to test out.  Definitely pretty cool, but if I'm going to use them in class, I'll definitely have to give the students some direction with them.  And, it seemed like the sprayers went through the fabric markers pretty quick...we probably threw out 1/3 of the fabric markers because they dried up after two days of using them.  For the most part, though, the kids were pretty excited to experiment and air brush different colors together.


Finally, on the Thursday before break, we made these periscopes using a kit I had purchased a while back from S&S Worldwide.  We ended up only having enough time to put them together...some students started decorating them, but I had to have them take the periscopes home so they wouldn't be in the way of the cleaners over the break!


Wednesday, February 20, 2013

Celebrating Art Contest: Honorable Mention!

Woohoo!  I'm excited to post that one of my student's artwork was chosen as an honorable mention for the K-3 grade level category for the Fall Celebrating Art contest!  Her Mondrian Collage can be seen on page 7 of the K-3 category on the Celebrating Art Facebook page.  While I'm a little sad that I didn't have a student artwork chosen to be a top-10 winner, I'm excited to know that I had one chosen for an honorable mention!  That means her and I were close! ;)  I had about 22 students accepted to be published in this book, so that means I'll get a free hardcover copy.  Super excited!

Cherry Blossom Branches

Here are some of our finished cherry blossom branches from my Kindergarten cherry blossom unit.  Two of my kinder classes have finished while one more class will finish when we return from February break (a snow day threw off our schedule!). 

This was the first time the kinders painted with watercolor paint in my art room with me and I think they did pretty well!  I really love how the sky turned out behind the branches...gives the illusion of clouds!  I also the flowers this year...instead of doing just straight pink, crumpled tissue paper, I handed out a variety of Valentine colors and had students create an actual flower using multiple pieces of tissue paper (center a different color than the petals).

I am, however, still a little bit partial to the 1st grade cherry blossom trees I did last year...I'm thinking I'm going to have to mesh these two projects together next year!  (Or, maybe I'll take a break from cherry blossom trees...who knows!?)


Art Club Fundraising

Now that we are done with our mural, it's time for my art club to start working on making some money for their field trip at the end of the year!  When I was growing up, I was fascinated with boondoggle.  Don't know what boondoggle is?  How about plastic lacing...or gimp?  My dad and my grandma taught me how to make key chains and I used to make them and sell them on the bus when I was in elementary school!

When I started my art club, I knew that the previous teacher used to do bake sales to raise money for a field trip.  To me, that's not very artistic (especially since parents made the stuff to sell!), plus it's so hard to have a bake sale in NYS now because of health code stuff.  If it's not prepared in a school kitchen, you can't sell it anymore!  We charge anywhere from 25 cents (for the short, zipper pulls...the Kinders like buying these and can afford them) to $2.50 for the bracelets below.

If you don't know about boondoggle, or you need brushing up on it, check out the Boondoggle Man website.  His site is AWESOME.  He has videos as well as step-by-step pictures for just about EVERY boondoggle stitch possible.

Here are the items I'll be teaching my kids how to make on Wednesday when we get back from break.  They've been hounding me to learn how to do this, but it takes a bit to teach these and we needed to finish the mural.

The bottle tab bracelets are really popular bracelets.  They're so fun to make because you can change up the color of the laces and/or the color of the tabs if you have enough!  One of the teachers at my school brought me TWO gallon coffee cans filled with tabs of all sorts of different colors!

There are lots of different ways to make these bracelets.  I based my pattern off of a bracelet my brother got from a friend.  A lot of times people make a single layer of tabs, but these can actually hurt to wear because the rough side of the tab is against the skin.  I use two layers of tabs, back to back and off set just a bit.  When school starts back up and I have access to my tabs and boondoggle, I post a tutorial!

These are the other types of bracelets that are pretty popular.  These cuff bracelets use a thin piece of metal, usually aluminum strips.  You can find lots of tutorials on how to make these in boondoggle books from Michaels or JoAnns (that's where I got all these patterns from).


For my last share of this post, I will share my boondoggle cheat sheet that I have made to send home with my students.  Once they get the basic stitches down (box, brick wall, spiral and zig zag), I send them home with sheet.  These all came from the Boondoggle Man website.  I simplified the directions and added a picture so that the students can do the fancy key chains at home without me.  The fishy/ribbon is a very popular key chain.  Last year we made about 30 of these, charged $2 for them and then donated the money to one of the caner walks that a teacher was participating in.