That's right! I'm a presenter for this year's Art of Ed Winter On-Line Conference! I'm so excited and honored to have been asked to do this! Check out the list of presentations here! I will be presenting on how to ROCK the sketchbook in your classroom! :)

Monday, December 22, 2014
Tuesday, December 16, 2014
Kindergarten Mondrian Collages
Reverting back to a good-ole staple in my Kindergarten curriculum! We did these Mondrian collages as a review of cutting and gluing, but also of geometric shapes, with corresponds with the Common Core math standards in kindergarten (identifying shapes). Another thing that corresponds with those math standards? Vertical and horizontal lines! Boy, if you could have seen the shock on my face when I presented Mondrian to the students. I asked the question, "What do you notice about the lines that Mondrian uses?" and the first response I received was "They are vertical and horizontal!" WOW!
I'm not going to get into how we created these because I've posted about it in the past. You can also read up on how I've used Mondrian in previous projects here.


I'm not going to get into how we created these because I've posted about it in the past. You can also read up on how I've used Mondrian in previous projects here.
2nd Grade: Fairy Tale Self-Portraits
And here's the second self-portrait project for the year! The first Common Core listening and learning strand in 2nd grade is Fairy Tales and Tall Tales. Last year, we created a collage of Beast's Castle from Beauty and the Beast. This year I decided to take the self-portrait approach and have students paint themselves as kings, queens, princes, and princesses from a fairy tale.
This project took a total of three days. On the first day, students used a mirror to draw their portrait in pencil. On the first day and second day, they used a skinny brush to paint their outlines with black paint. The second and third day was devoted to painting their portraits. I told students to paint their backgrounds a single color, for the sake of time, but you'll notice that a few students had enough time to get a little more creative with their backgrounds. :) This project proved to be a great one for teaching students how to make smart choices with the type of paint brush they pick for a painting.


This project took a total of three days. On the first day, students used a mirror to draw their portrait in pencil. On the first day and second day, they used a skinny brush to paint their outlines with black paint. The second and third day was devoted to painting their portraits. I told students to paint their backgrounds a single color, for the sake of time, but you'll notice that a few students had enough time to get a little more creative with their backgrounds. :) This project proved to be a great one for teaching students how to make smart choices with the type of paint brush they pick for a painting.
Art 7: Acrylic Graffiti Piece
Ok, Mrs. Impey...it's time to get back into your blog! I don't know what it is about this year, but I am so UNORGANIZED it isn't even funny! It must be the 1-year old toddler I have running around EVERYWHERE! I am so backed up on artwork...getting it graded, photographed, up on Artsonia, and on my blog!
These are my 7th graders graffiti projects from this year. Last year, we did the final project on the cover of their sketchbooks. This year, I had them do it on 10" x 14" canvas board, and I like the results much better! You can look back at last year's project to get the gist of the planning behind this.


Of course, after I had already completed this project, I attended the NYSATA conference and one of the workshops I attended was about graffiti. I'm SO EXCITED about the new concepts and techniques I learned...I wish I could do this unit all over again! One of the websites I learned about is Graffiti Creator. From what I understand, it's been around for a while, but I don't know how I missed it!
Usually, I have the students free-hand all of their lettering, and I usually only get a hand full who are naturally talented with the wildstyle fonts. Next year, I plan on having them do the brainstorming process to come up with their tag name, and then, instead of designing everything from scratch, I'm going to let them play around with the Graffiti Creator website! Once they've designed a tag, they will then transpose it from their print-out to their canvas.
Usually, I have the students free-hand all of their lettering, and I usually only get a hand full who are naturally talented with the wildstyle fonts. Next year, I plan on having them do the brainstorming process to come up with their tag name, and then, instead of designing everything from scratch, I'm going to let them play around with the Graffiti Creator website! Once they've designed a tag, they will then transpose it from their print-out to their canvas.
Thursday, November 13, 2014
Studio Art: Micography Portraits
I am one of those art teachers that normally HATES doing self-portraits. I have never liked drawing people. Very rarely do I do more than one self-portrait lesson over a expanse of grade levels, yet here I am this year and I have already done two self-portrait projects, with a third one in the makings! My Studio Art classes started their drawing unit a while back and we kicked off the unit with self-portraits. (Currently, they are finishing up mannequin drawings and we will be starting our last project for the unit tomorrow!)

Since my last bell ringer artist in Studio Art was Chuck Close, it seemed appropriate to do a self-portrait using the grid method. We had a modeling day in class where students had to pose for three portraits. I printed them out in black and white, they chose their favorite, and taped it into their sketchbooks. I had them tape a piece of transparency paper over the top to draw the grid. Doing it this way is an awesome way to ensure their picture doesn't get ruined if they mess up the grid! A few students measured wrong and all they had to do was remove the transparency paper, tape a new one down, and start over.

As a sketchbook assignment, I asked students to create a list of words about themselves on a page in their sketchbook. They could simply list the words (though that got less points for creativity on my homework rubric), write a poem, illustrate them, etc. The words from that homework assignment became the words they used on their projects. This also, unknowlingly, integrated their current ELA Common Core module. In Module 1, students in 9th grade just finished reading "St. Lucy's Home for Girls Raised by Wolves," by Karen Russell. As part of the unit, students had to analyze characters from the book, using descriptive words. Essentially, I was asking students to analyze themselves in this project, and many of the words they used to describe themselves were academic vocabulary words from their ELA unit!


Since my last bell ringer artist in Studio Art was Chuck Close, it seemed appropriate to do a self-portrait using the grid method. We had a modeling day in class where students had to pose for three portraits. I printed them out in black and white, they chose their favorite, and taped it into their sketchbooks. I had them tape a piece of transparency paper over the top to draw the grid. Doing it this way is an awesome way to ensure their picture doesn't get ruined if they mess up the grid! A few students measured wrong and all they had to do was remove the transparency paper, tape a new one down, and start over.
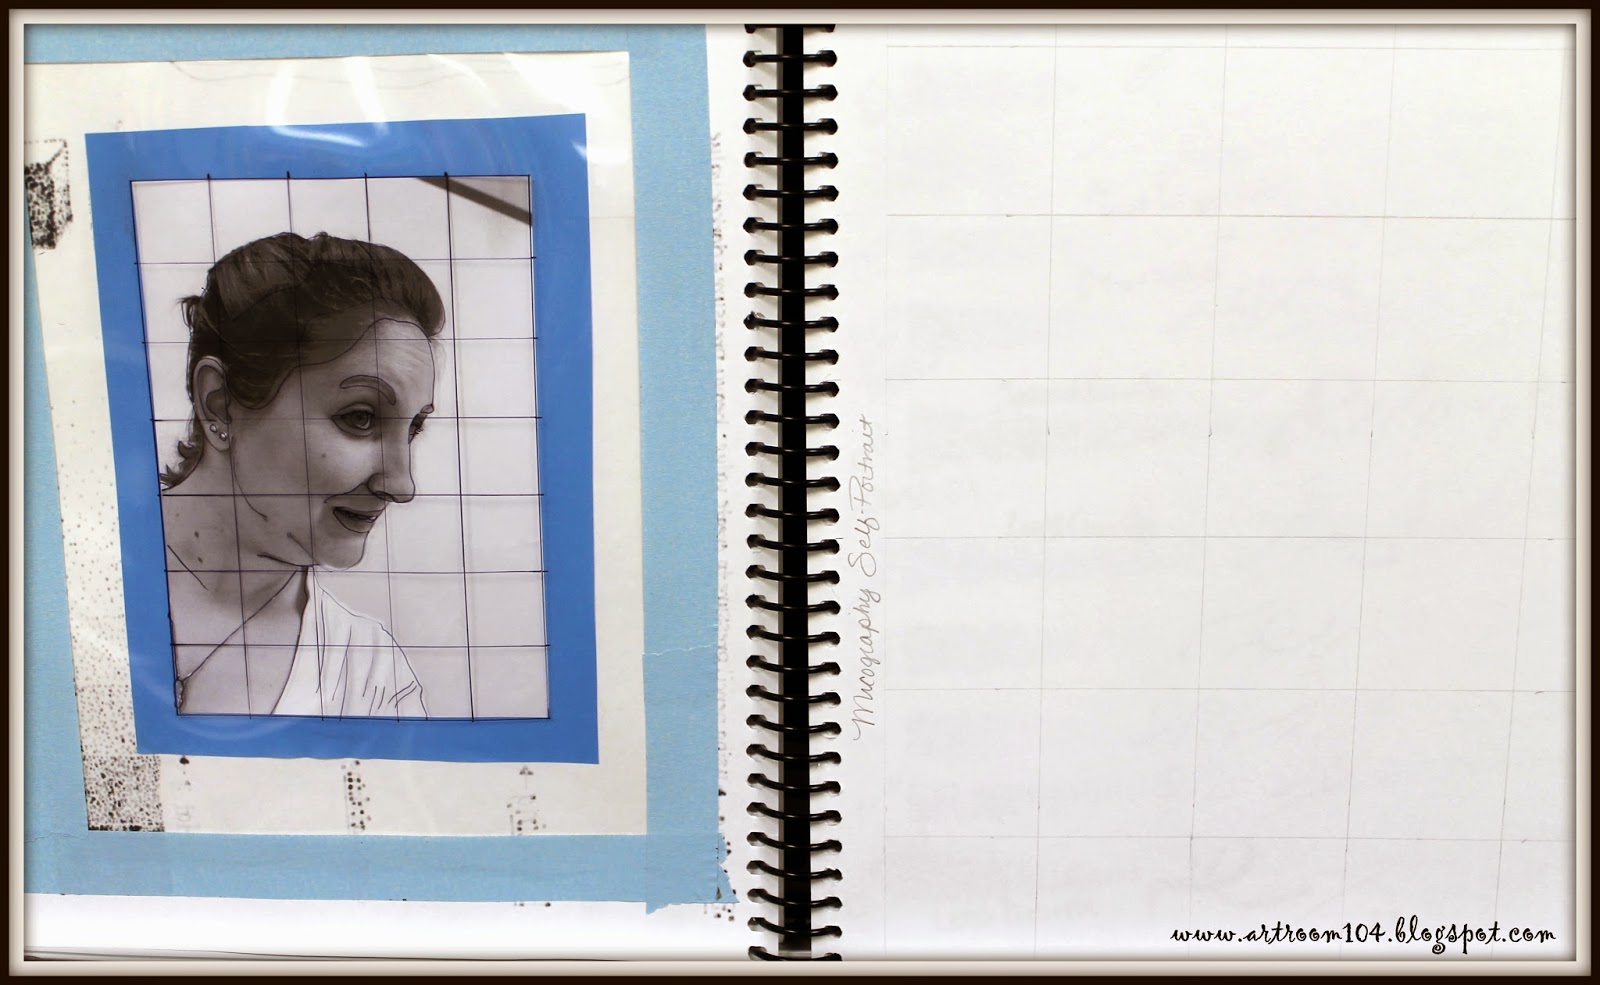
Our pictures were 5"x7" and the drawing paper was 10"x14". Makes for a good discussion about proportion as well! (Ahem, math anyone??)
As a sketchbook assignment, I asked students to create a list of words about themselves on a page in their sketchbook. They could simply list the words (though that got less points for creativity on my homework rubric), write a poem, illustrate them, etc. The words from that homework assignment became the words they used on their projects. This also, unknowlingly, integrated their current ELA Common Core module. In Module 1, students in 9th grade just finished reading "St. Lucy's Home for Girls Raised by Wolves," by Karen Russell. As part of the unit, students had to analyze characters from the book, using descriptive words. Essentially, I was asking students to analyze themselves in this project, and many of the words they used to describe themselves were academic vocabulary words from their ELA unit!
The following collages are some progress shots with the finished product.


Thursday, October 9, 2014
More Artist Bell Ringers & Sketchbook Use
A week or so ago, I posted about how I am using sketchbooks this year in my Studio class. I am going to add to that article by posting the latest things we've added to our sketchbooks IN CLASS via bell ringers and classwork.
First off, students did have a sketchbook assignment over the weekend a few weeks ago...but only because it pertained to what they were doing in class. Students were completing the zentangled master's project (I will be sharing the completed ones from this year in the next few days), so I had them practice zentangles by zentangling a random object. (Mine is the camera!)


First off, students did have a sketchbook assignment over the weekend a few weeks ago...but only because it pertained to what they were doing in class. Students were completing the zentangled master's project (I will be sharing the completed ones from this year in the next few days), so I had them practice zentangles by zentangling a random object. (Mine is the camera!)
Along with the zentangle project, students had to create a page in their sketchbook to doodle, practice and make notes about their main project. I printed out a copy of each person's original painting. Some students decided to grid it, so I had them tape transparency paper over the original. I encouraged students to try out different zentangles on that page before putting them on their final drawing.
Eventually, I want to start photographing student progress periodically throughout the project and have students past the photograph into their sketchbook. I'll then have them reflect via bell ringer on what they want to accomplish during the week on the project, what they might be wanting to change, what they are having a hard time on, etc.
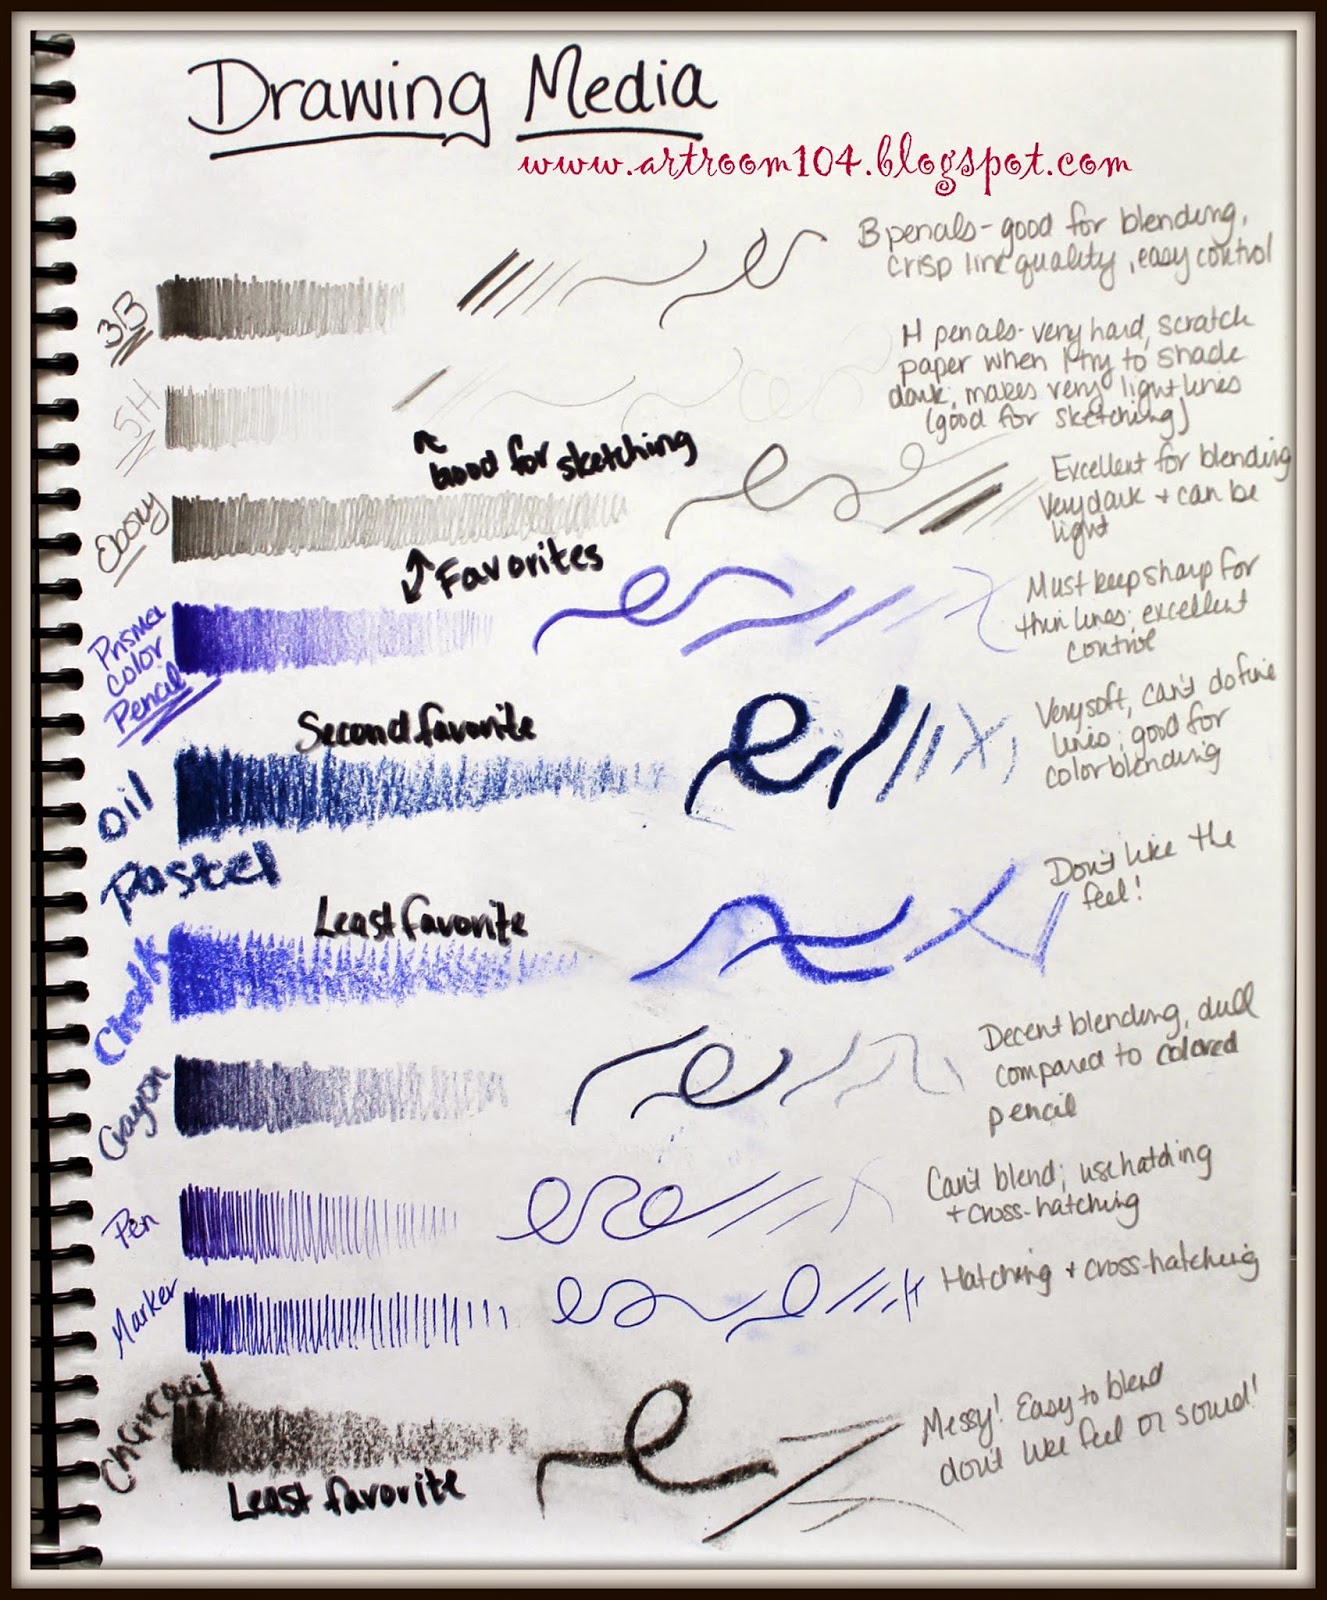
We are currently onto our next unit, which is 2-D media, focusing on drawing. In an effort to cut down on the notes I had students take last year in their note packets, I'm trying to transfer a lot of these notes into class activities in the sketchbook. The first one we've done is this value page. Students had to create a value scale, a shaded cube, and write the name and definition for each of the four shading techniques (blending, hatching, cross-hatching, and stippling). What's great about this being in the sketchbook is that it's less paper I have to copy and waste and it's always in their sketchbook as a reminder of what value is for homework sketch assignments.
I've gone ahead and done the next classroom activity in my sketchbook...the students have not done this yet. Our current project, which we are officially starting Monday, is going to be self-portraits done on a grid system using words as value (micography)...hence the value practice. Our next project will be to practice doing observational drawings using the art mannequins. Last year, I had students to their art mannequin drawing using only pencil or Sharpie, however this year I want to be more flexible. Therefore, I will be having the students create a "Drawing Media" page in their sketchbook. They will have to create a simple value scale, draw a variety of lines, label each medium, and make some notes (i.e. Do you like the medium? Which is your least favorite and most favorite and why? Do you think a certain type of drawing medium is better for one type of drawing than another? etc.)
And finally, here are some artist bell ringer pages that we have completed. I have decided that I am going to do a different artist every other week so that I can use bell ringers to review other material. We already did Piet Mondrian, and next came Joan Miro. I have decided on this set "schedule" for these weekly artist bell ringers:
Day 1: Students copy down some brief biographical information and paste a picture of the artist and one artwork by the artist into their sketchbook.
Day 2: Students paste two more artworks with the credit lines.
Day 3: Students paste one artwork with credit line and then must make a list of characteristics that they observe about that artist's work. I always go over this to make sure we are on the same page once everyone has it completed.
Day 4: Students receive two paintings to paste into their books. They must tell me which one is by the artist and two reasons why.
Day 5: I ask students to do a quick, 2-minute sketch of design that is inspired by the artist.
This week's artist is Chuck Close. We have one more day of bell ringers for him. I choose to do Chuck Close right before we do our self-portrait project because we are going to be using a grid system to do our initial drawing.
The students are slowly getting better and better with these bell ringers. I'm finding that I am teaching them note-taking and organizational skills at the same time. I know a lot of these students must take notes on their own in other classes, but I am unsure if they actually know the proper way to keep an organized note page or if they just aren't connecting that knowledge from other areas to what I am doing with these bell ringers in art. Either way, I hope by the end of the year, each student will be able to have nice, neat, concise note pages for each artist!
Tuesday, October 7, 2014
Sculpture: Altered Books
The first project my sculpture class completed was an altered book project. I should students a bunch of examples of altered books that have been cut, folded, painted, drawn on, etc. They received a project sheet with the basic guidelines and the rubric. Currently my elective has 16 students in it!!! I'm trying to keep the Common Core stuff to a minimum (gasp!) so that I can keep my enrollment up. After all, this is an elective class that students are choosing to take instead of a study hall...I've got to give them props somehow!
Here is the project page and rubric students received:


And here are the finished products! A few students struggled with this...particularly the ones who added the class two weeks into school and then tried to rush to get caught up. I'm hoping they will redeem themselves on the next project we've started...paper mache taxidermy! I'll share progress photos soon!

Some students wanted to paint their sculptures. I brought out spray bottles and liquid watercolor paint for them to spray.

This student meticulously cut out the piano from her pages using a template and then painted it with acrylic.


More watercolor...


This person used some copper foil to add to his book. Unfortunately, he went a little overboard with the origami bird. Originally it was done in paper and was colored purple with marker...it looked much better then.


Subscribe to:
Posts (Atom)